The process of creating a gateway / connector pair starts with logging into your ThinkIQ instance to configure a gateway and a connector, downloading an installer, and running a local program. The local program accesses the ThinkIQ server and uses your configuration information to create a pair of local objects: a Gateway and a Connector. These objects run locally on a Windows or Linux on-premise computer to enable connecting your local device with a ThinkIQ data ingestion server.
There are several different types of connectors. These instructions apply to every available type.
For information pertaining to a specific connector, see the documentation for that connector.
Prerequisites
Before installing a gateway / connector combination, check that your system is compatible:
- If your computer is running Microsoft Windows, does it match the following required hardware and software specifications?
- x64 CPU architecture
- Windows 10 or Windows 11
- If your computer is running Linux, does it match the following hardware and software specifications?
- It a Debian-based distribution of Linux
- x64 CPU architecture
- A Debian Linux distribution compatible with .NET 8.0 (see list here: https://github.com/dotnet/core/blob/main/release-notes/8.0/supported-os.md)
- Is the machine using a modern browser: Edge, Chrome, Firefox, and others? The software will not run on Internet Explorer.
- Does the machine have appropriate outbound connectivity?
- Can the machine browse to your instance of the ThinkIQ platform, e.g. https://yourcompany.thinkiq.net?
- Do you have user credentials that allow you to add Gateways/Connectors? The default User Group for this is Configuration.
- Can the machine connect to your machine over a network i.e., can it connect remotely?
- If it cannot the only choice is to install on the physical machine where the is running. However, sometimes you cannot install locally – on the source machine. For example, when you are running a PLC on a machine, you cannot install the connector on the same machine
- The "ASP.NET Core Runtime" and the "Windows Desktop Runtime" are required for installation. If needed, you will be prompted to download and install them before the process continues. The install process flows more smoothly if you download and install these files ahead of time. You can download them here.
- The OPC Classic .Net API is required for OPC Classic connectors that communication locally over HDA. This includes OPC Classic, OSISoft PI and the Rockwell . The install process flows more smoothly if you download and install this ahead of time. Download the OPC Core Components Redistributables (ZIP/MSI/MSM) now by clicking here.
Create the Gateway instance.
-
Browse to your ThinkIQ instance as a user in the Configuration user group.
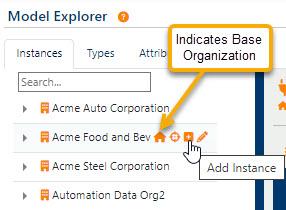
- In the Model Explorer tree on the Instances tab, use the Add Instance (+) button to add a Gateway. Each connector must be installed under its own gateway. The Gateway is the connection between the on-premise computer and the ThinkIQ platform in the cloud. In principle, you can install the gateway anywhere in your model.
Create the Gateway
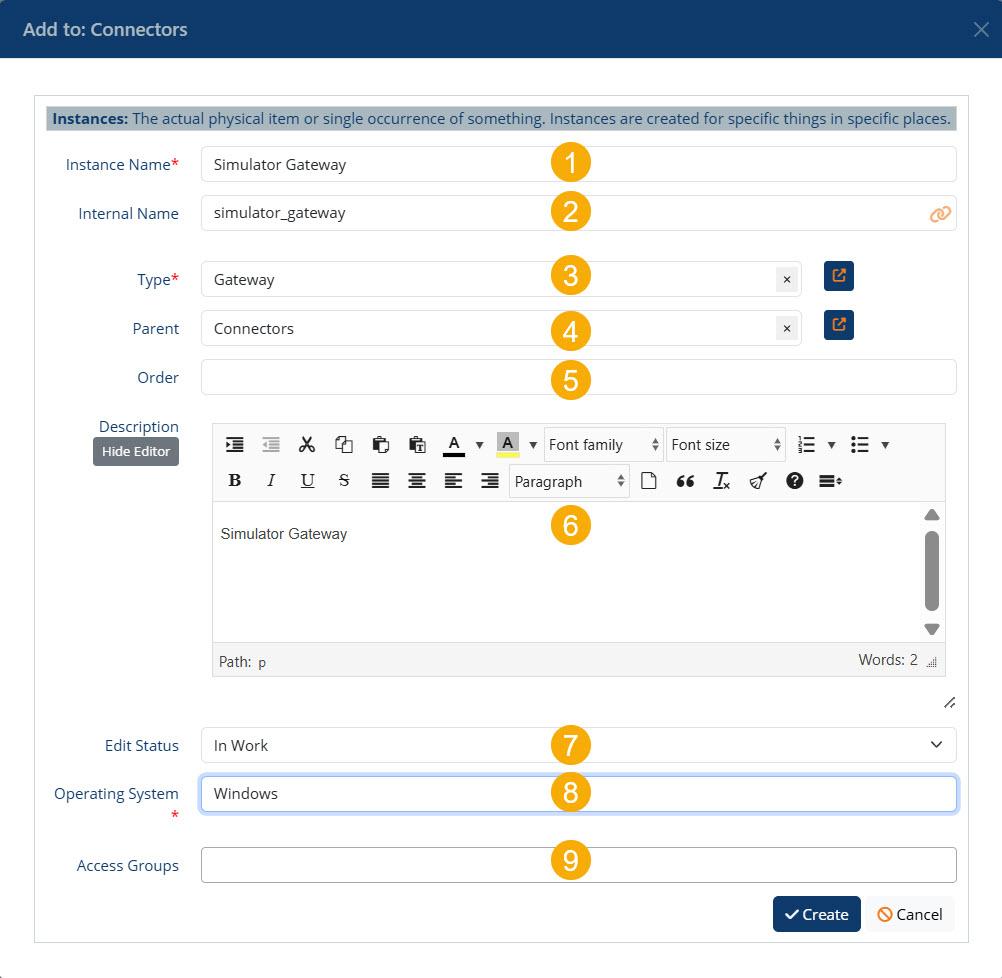
- Give the Gateway a name.
- The Internal Name will be automatically inserted.
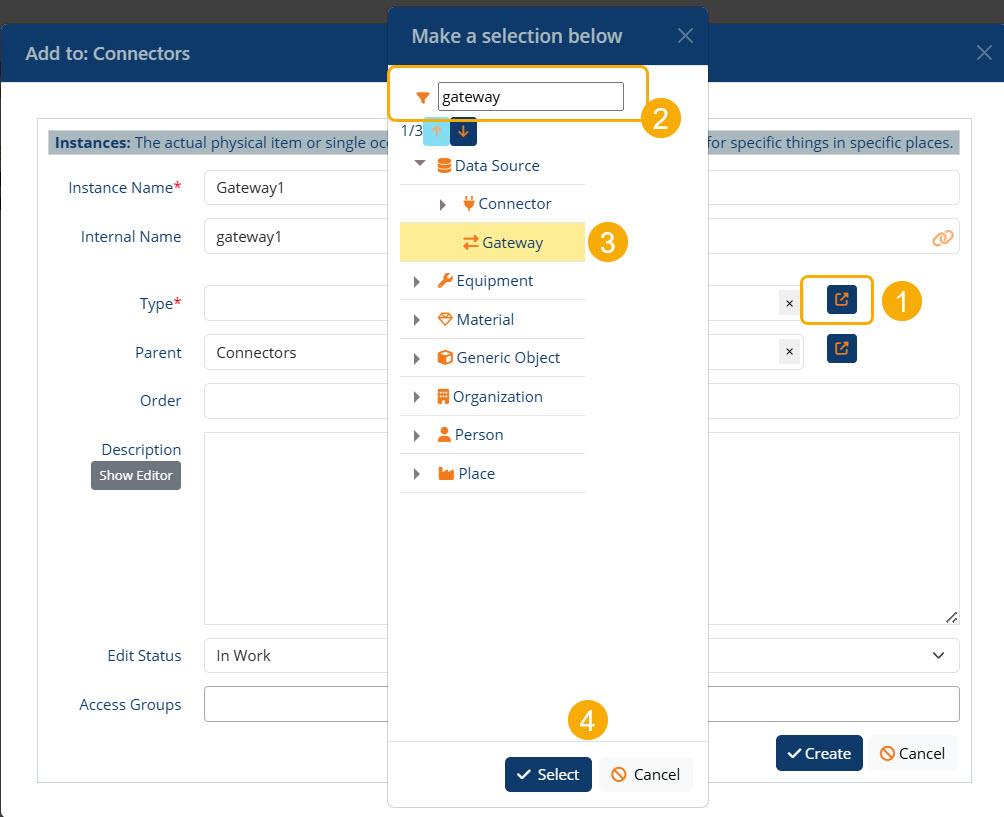
- Using the type-picker, open the Type system, search for, and select the type Gateway. Use the search box to find the Gateway type. [Required]
- The Parent is automatically filled based on the location in the Tree.
- Gateways can be ordered for display purposes. [Optional]
- Enter a description. [Optional]. Use the Show Editor button to open and edit the Description.
- Edit Status. Defaults to: In Work.
- Select the Operating System to install the Gateway in. Options are Windows and Linux. [Required]
- Override default access to the Gateway.
IMPORTANT: the default access for Instances is set in the Admin Console and is set to Engineering users and above. Registered users and Operators can only View the Instance. Be very careful if you choose to change this field.
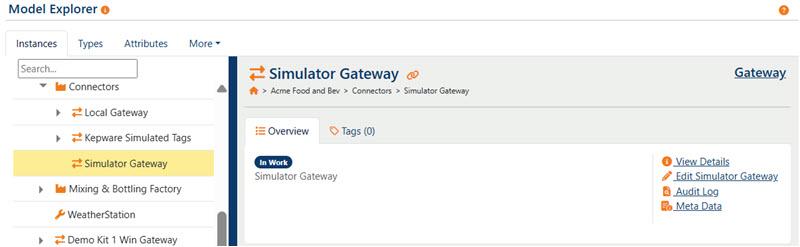
Once the gateway is created, it will show in the Model Explorer tree under it's parent instance. Note there are no tags yet.
Connecting a local machine to the ThinkIQ network requires both a gateway and a connector. The previous section covered the configuration of a new gateway. The next section looks at configuring a new connector.
Create the Connector Instance
- In the Model Explorer, navigate to the Gateway under which the Connector will operate. (Usually the one you just created.)
- Use the Add Instance (+) button to add a connector. The Connector is the connection between the on-premise computer and the .
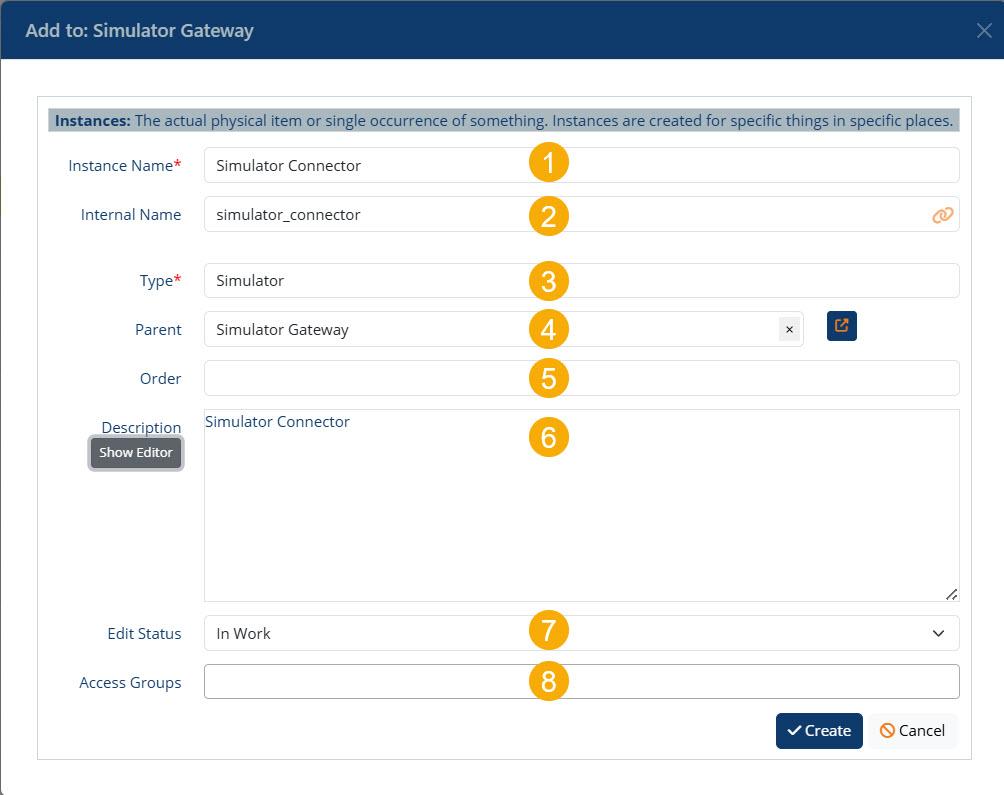
Create the Connector
- Give the Connector a name.
- The Internal Name will be automatically inserted.
- The connector Type is a drop-down selection. [Required]
- The Parent is automatically filled based on the location in the Tree.
- Connectors can be ordered for display purposes. [Optional]
- Enter a description. [Optional]
- Edit Status. Defaults to: In Work.
- Override default access to the Connector.
IMPORTANT: the default access for Instances is set in the Admin Console and is set to Engineering users and above. Registered users and Operators can only View the Instance. Be very careful if you choose to change this field.
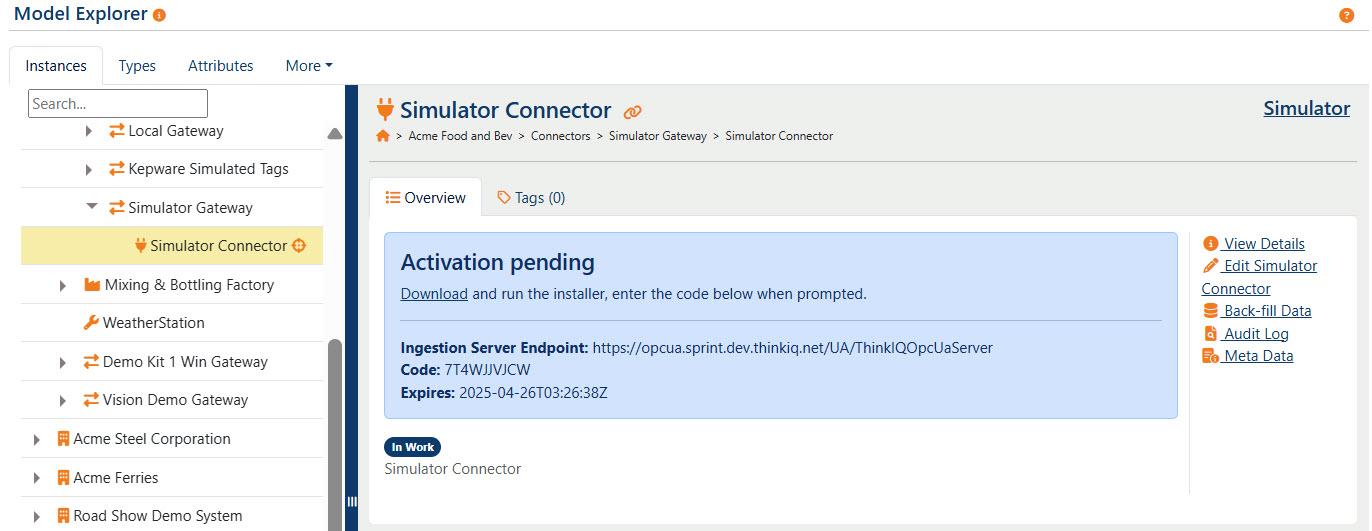
After the connector is created, Activation pending will show in the connector Overview tab. An Activation Code with its expiration date is displayed. You will use the Activation Code when you create the gateway/connector on your local computer. The ThinkIQ system uses the Activation Code to link your local computer to the configuration details that you provided when creating the gateway and connector. The code will expire after four hours. Use the Download link to download the installer. You will need the Ingestion Server Endpoint and the activation Code when you run the installer.
Local Gateway / Connector Setup on Microsoft® Windows®
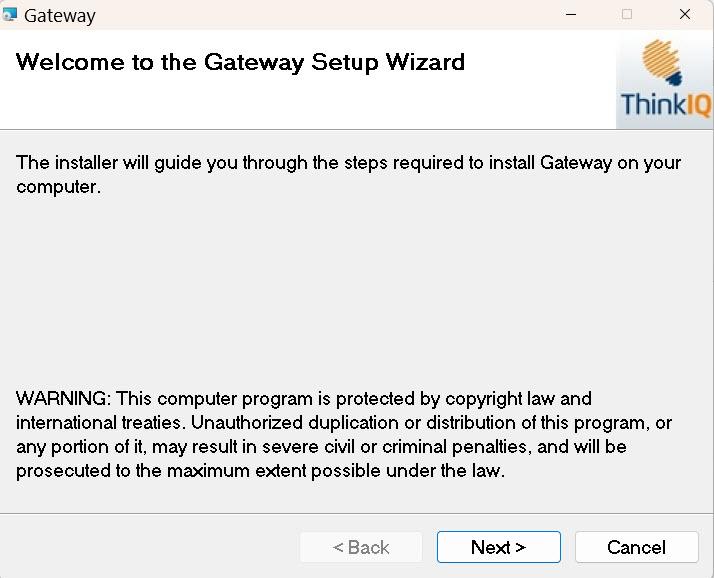
The process of getting a gateway and connector set up on a local machine running Microsoft Windows starts with running the ThinkIQ.Gateway.msi package that was downloaded in the previous steps. It is strongly suggested that you install all prerequisites before starting the installation.
The installer proceeds step by step and will vary based on the connector type being installed. The first screens are introductory and contain accepting the license agreement and other confirmations.
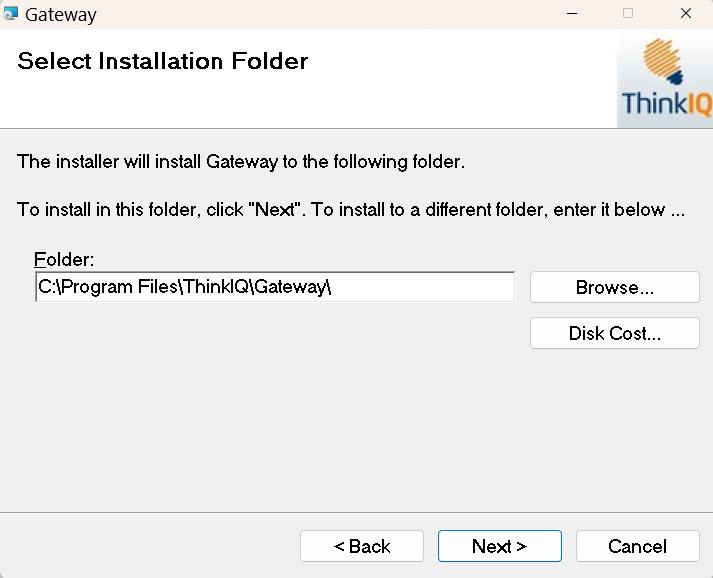
To continue the installation, confirm or change the location of the Installation Folder.
Installing the Gateway and Connector
The installation of the Gateway and Connector itself starts with a request to enter the Ingestion Server Endpoint and the Activation code displayed on the connector page where the Gateway and Connector were created in the ThinkIQ portal. After entering the information, use the Test and establish connection button to test connectivity to the Portal.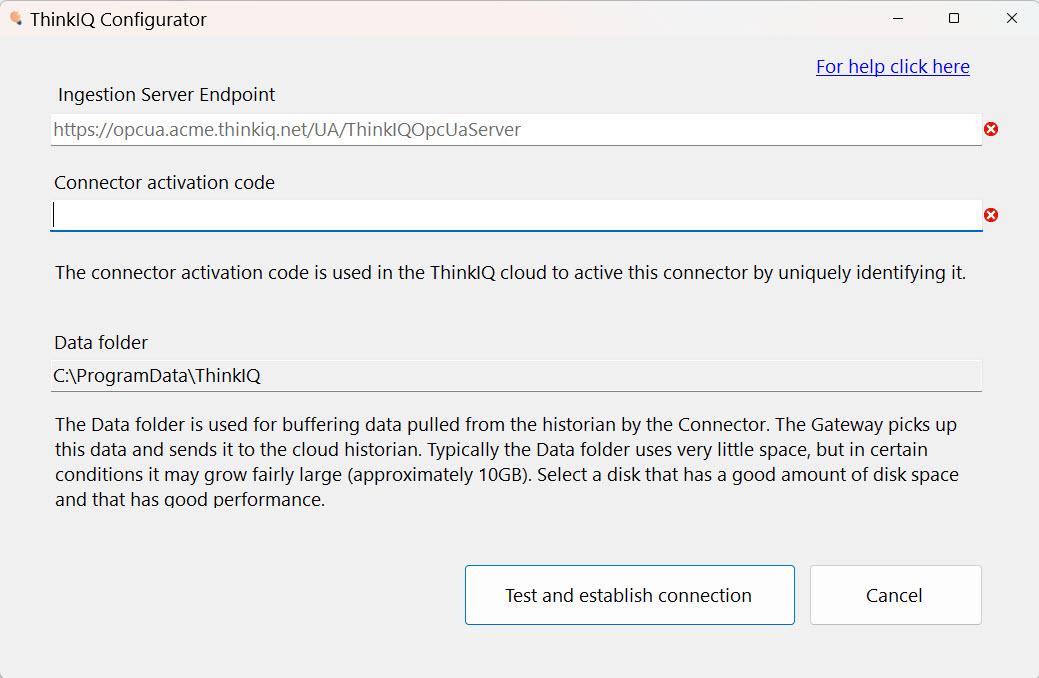
Note: If the installer does not move past the activation code entry page there may be network security on the host computer/network blocking communication to the ThinkIQ platform.
The .NET 8.0 runtime is required. When a system does not have the .NET 8.0 runtime – or only a portion of the required runtime – you will receive a message with a link to download .NET Core. The installation will exit and .NET Core must be installed before you can restart the installation.
The installation will continue with configuration steps and prompt for information that is different for each of the connector types.
Refer to the following for details:
- OPC UA Live Data
- OPC Classic (HDA, DA)
- Aveva (OsiSoft) Historian Connector
- Aveva (Wonderware) Historian Connector
- MQTT Connector
- Rockwell Historian
________________________________________________________________________________________________________
Once the configuration completes, click OK to close the dialog

Refresh the Connector page. The connector should be updated as shown below.

Mapping Tags
To receive time series data from a new connector, its tags must be properly linked to attributes in ThinkIQ system. Learn how to Map Tags to Data Sources.
___________________________________________________________________________________________
Windows Services
After installation there will be three services visible in the Window Services control panel: the ThinkIQ North Service (the gateway), the ThinkIQ southbound service - named after the connector type, for example, 'ThinkIQ Connector', and the ThinkIQ System Monitor, which is responsible for showing that both the northbound and southbound services are running. To stop a connector, simply stop the southbound service. To stop the gateway, stop the northbound service. To stop everything, stop northbound service, southbound service, and the ThinkIQ monitor service.
South Service
After activation, the South Service is set up on the computer where the connector is installed. The South Service Settings box displays the connector settings. These settings are editable by opening the file on the machine where the connector is installed in C:\Program Files\ThinkIQ\SouthBridgeService\appsettings.json.

Settings that can be customized include the following:
DataStorer
In the Params row
DataRootDir the location where tag data is stored when the system loses connectivity to the cloud.
MaxFileCount the maximum number of files that can be stored in the above location. As connectivity is restored and the data is once again flowing to the cloud, the files are deleted. The individual files are generally quite small, but the maximum number to store during store and forward is limited by disk drive size and can be effected by the number of tags being historized.
App Settings
"AcquiredTagChunkSize": 300
"AttributeChangeCheckTrigger": 0
"UseOnPremiseAcquiredTagList": false
"HistSeizedThresholdInSeconds": "1800"
"UseAcquiredTagListAsWhiteList": false
"TagChangeCheckIntervalInSeconds": 0
"OnPremiseAcquiredTagListFilePath": "./OnPremiseAcquiredTagList.txt"
"AttributeChangeCheckIntervalInSeconds" 0
For a deeper dive, read more here.
Has the Installation Succeeded?
To help determine whether the installation was a success and the gateway and connector are running properly, ThinkIQ provides two tools, both of which are located in this folder: C:\Program Files\ThinkIQ\Gateway\Configurator
- ThinkIQ.Connect.exe – allows tests on both the gateway and the connector.
- ThinkIQ.LogView.exe – allows all system logs to be viewed in one location.
ThinkIQ Connection Monitor tool (ThinkIQ.Connect.exe)
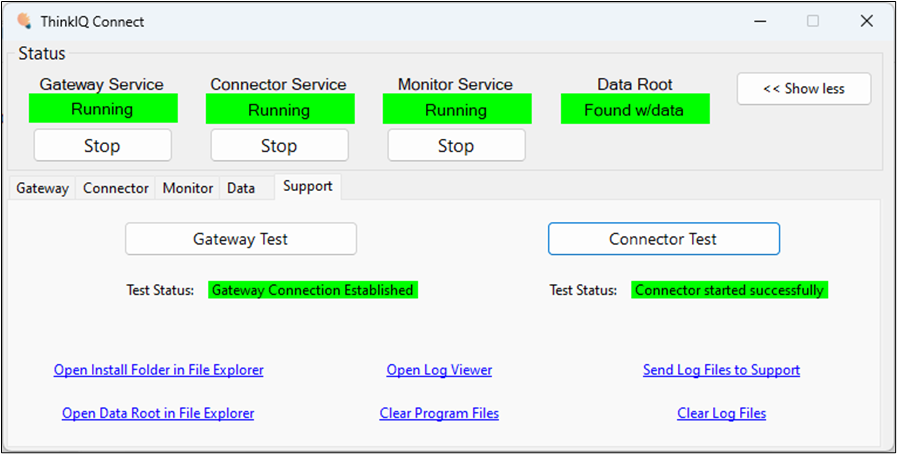
When you start the ThinkIQ Connection Monitor tool, it appears in minimal mode with just information about the three services and the data root. The green signals that things are running properly. When any of these indicators is yellow, there is a problem. When any are red, there is a fatal error.
Click on the "Support" tab. Notice the two buttons labeled Gateway Test and Connector Test.
- Click the Gateway Test button to verify that the link from your computer to the ThinkIQ servers are being made properly.
- Click the Connector Test button to verify that the connection to your hardware device is running properly.
Here is what the display looks like when both gateway and connector links have been established properly.
The tabs on the application do the following:
- Gateway: displays where the gateway is located in the model and displays the End Point URL to the ThinkIQ server.
- Connector: displays the connector type, current tag count, and allows changing the Tag Change and Attribute Change rates. These settings are part of the South Service settings.
- Monitor: displays the End Point URL to the ThinkIQ server and describes the Monitor service.
- Data: displays the location of the Data Root folder and facilitates deleting Data Files. (usually not needed)
- Support: displays and allows testing the status of Gateway and Connector. Includes links to system folders and opens the Log Viewer (see below).
ThinkIQ.LogView.exe
Each of the five major system components writes to log files. The Log Viewer application reads these logs and provides a single view into sequence of steps that have been performed. 