Instances are created in the Model Explorer under the Instances tab. In the Tree Explorer on the left are all the instances in the system, with general information and details about a selected instance in the pane on the right. The tree structure can be expanded to traverse all instances in the system. All instances are instantiations of a type in the system. An instance represents an actual physical item or a single occurrence of something. Instances are created for specific things in specific places in the Model.
Creating an Instance
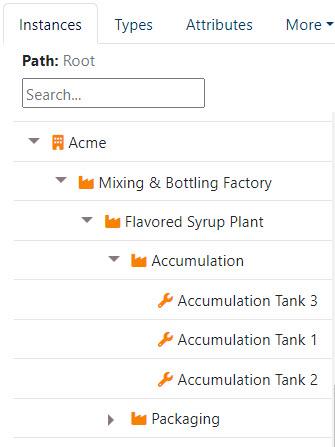
New instances are created in the Model Explorer. When creating instances, consider where in the Model they belong, and create them accordingly. For example, in the following image Accumulation Tanks 1,2 and 3 are under the Accumulation area, which resides under the Flavored Syrup Plant which in turn is under the Mixing & Bottling Factory, a site within the Acme Organization.
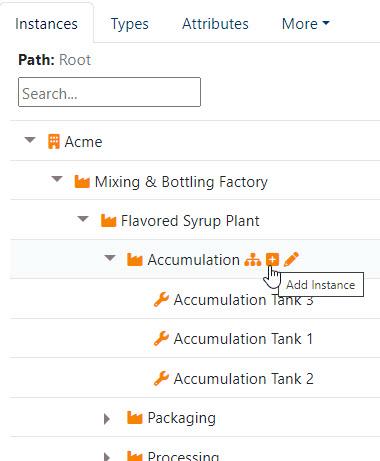
To add another equipment, click the plus icon next to the area or place where the equipment should be. In this case, we click the Add Instance icon next to the area Accumulation.
The instance being created below inherits all attributes and behaviors from the Accumulation Tank type.
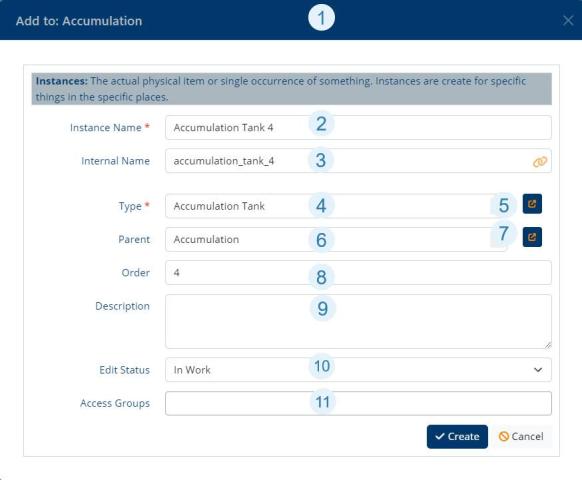
Create an Instance
- You can see where your new instance is being added in the Model.
- Give the instance a name.
- The internal name will be auto-generated.
You can unlink the auto-generated name and create your own using the links icon at the right of the field. This is sometimes done because users want a specific FQN (fully qualified name) or for use in scripting. - The type of the instance.
- Use the pop-out icon to pick from the list of types in the system. Note that you can use the Search field in the pop-out dialog to quickly find a type.
- The Parent of the instance in the tree. This defaults to the location where you clicked Add Instance.
- It can be changed using the pop-out tree selector.
- Use this field to order the display of the instance in the Tree Explorer (optional).
- Provide a description of the instance. This shows on the instance Overview tab and can be useful information (optional).
- Edit Status allows you to keep track of the status of your types. The options are In Work, In Review, Approved, and Done.
- Only users with qualified Access Levels will see this field and can set it. The field manages who can see the instance in the Instance Tree (optional).
Once the instance is created you will see a tabbed table in the right pane which contains rich information about each instance.
The Overview tab provides general information about an instance, including a description of the instance, the type it is derived from, and the status of the instance (In Work, In Review, Approved, Done). If there is a Material Account associated with the instance, you will see this as well. There are also several links for learning more about the instance:
- View Details - Opens the Details page about the instance.
- Edit the instance - Edit the instance definition.
- Material Flow - When a Material Account is configured, this link will open the Material Flow diagram.
- Export - Exports the Instance data - and all instances in the tree below the selected instance - to a JSON file that can be imported into another ThinkIQ platform.
- Trend - Opens a Trend page with a chart of the current attributes of the selected instance.
- Set Min/Max Ranges - sets a calculated min/max range for applicable attributes based on history data.
- Audit Log - View actions on the attribute including date, action, and user.
- Meta Data - View the ID, Relative Name, FQN, Creation dates, and Update dates for the instance.
The Attributes tab displays the attributes grid and lists the attributes of the instance. Attributes are the rich data about the instance. If attributes are connected to a data source, live data and static data about the instance is displayed. Attributes are inherited from the type from witch the instance was created. Additional attributes for an instance are added in the attributes grid; these attributes are known as 'Mavericks'. Depending on the Data Type of an attribute, links are provided to Trend, Auto Generate Ranges, and Backfill data.
The Scripts tab is where scripts are created on the instance. (Read more about scripts here.)
The Relationships tab displays the instance's relationships to other items in the model. It is particularly useful for equipment.
The Materials tab displays data about material movements when they are configured on the instance.
Adding Attributes - Mavericks - to an Instance
When you add an attribute directly to an instance, you are adding a Maverick. The system allows you to do this, and sometimes it is the practical approach, but the caveat is that you are creating an exception: you will have an instance that isn't the same as the type. You can still programmatically query the instance and ask what type it is: it will return the type correctly, and, from every other point of view it will behave normally. But you have lost a bit of structure and many of the benefits of a strong type system. A script written on the type may not work as needed for the specialized instance, for example.
Some circumstances may support using a maverick. Let's say you have 1,500 bins in your organization, that are all derived from a type, but recently 10 of those bins have had two additional sensors added to them to accurately measure content level. There is no expectation that these sensors will ever be added to the other 1,490 bins - they are only applicable to these specific bins. In this case, maverick attributes to support the two sensors on the 10 bins makes sense - they really are outliers.
In another scenario, you may want to add an attribute that applies to almost all instances - say, 23 out of 25. In this case, it probably makes sense to add the attribute to the type. The new attribute(s) will propagate to all of the instances, and it is perfectly OK to leave the attributes blank on the instances that do not require the data.
Use mavericks when necessary, but as a rule of thumb, don't create them if you have other options.
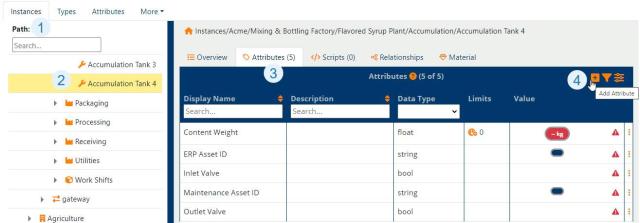
Add Maverick Attributes to an Instance
- Select the instance
- Highlight the instance to change
- Open the Attributes tab
- Click the plus icon to open the Add Attribute dialog.
Add Attributes Dialog
The Add Attributes dialog box will change depending on the Data Type of the Attribute. (See Attributes for a detailed review.)


